Solved: Please provide role name
If you work with Azure IAM, you’ve likely tried creating Custom Roles using a JSON definition file and the Azure CLI. It seems straightforward, but there is a specific behavior in the az role definition create command that can lead to frustrating errors like please provide role name or result in roles created with a GUID as their display name.
Here is what I discovered about how the CLI actually parses the JSON and how to fix it.
The Problem
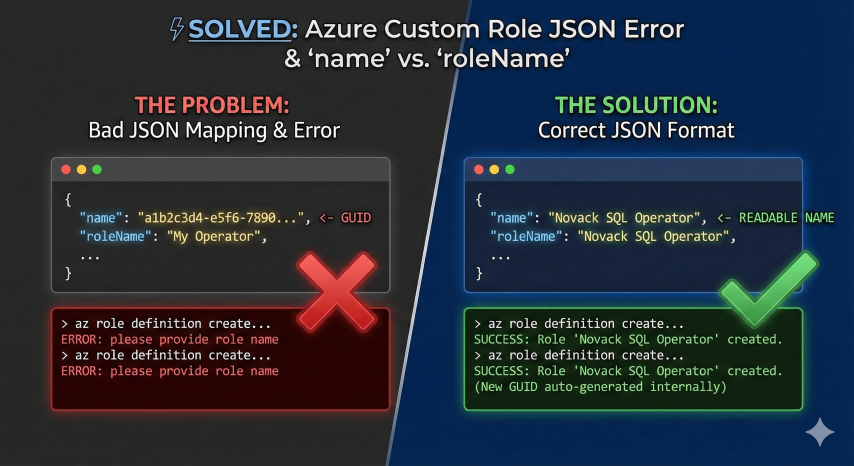
You have a JSON file (e.g., role.json) that looks technically correct. You might be used to ARM templates where name usually represents the Resource ID (a GUID). So, you structure your file like this:
1
2
3
4
5
6
7
{
  "name": "a1b2c3d4-e5f6-7890-a1b2-c3d4e5f67890",
  "roleName": "My Custom Operator",
  "description": "...",
  "permissions": [ ... ],
  "assignableScopes": [ ... ]
}
When you run the command:
1
az role definition create --role-definition @role.json
One of two things happens:
- The Error: The CLI fails with
please provide role name. This is confusing because the propertyroleNameis clearly there in the file. - The Bad Mapping: The role is created, but when you look at it in the Portal, its Display Name is
a1b2c3d4-e5f6-7890-a1b2-c3d4e5f67890instead of “My Custom Operator”.
The Finding
The issue lies in how the Azure CLI maps the input JSON properties during the creation process.
Through testing, I found that you should not put a GUID in the name field of your input JSON.
Even though name represents the unique ID in the resulting Azure resource, the CLI expects the input name field to contain the Descriptive Name (the same string you want for roleName).
When Azure processes this input:
- It takes the string from your input
name. - It assigns that string to the
roleName(Display Name) property. - It automatically generates a new, valid GUID for the internal System ID and stores it in the
nameproperty. So when you query the role later,namewill be a GUID, androleNamewill be your descriptive name.
The Solution
To ensure your role is created correctly and to avoid the “missing name” error, simply repeat your descriptive name in the name field.
Correct JSON Format
1
2
3
4
5
6
7
8
9
10
11
12
13
14
15
16
17
18
19
{
  "name": "SQL Backup Operator",
  "description": "Allows exporting Azure SQL databases...",
  "type": "Microsoft.Authorization/roleDefinitions",
  "permissions": [
    {
      "actions": [
        "Microsoft.Sql/servers/read",
        "Microsoft.Sql/servers/databases/read"
      ],
      "notActions": [],
      "dataActions": [],
      "notDataActions": []
    }
  ],
  "assignableScopes": [
    "/subscriptions/your-subscription-id/resourceGroups/your-rg"
  ]
}
The Command
Now, you can run the standard command without issues:
1
az role definition create --role-definition @role_fixed.json
Summary
- Input
name: Should be the descriptive string (e.g., “My Role”). - Output ID: Azure will handle the GUID generation for you.
By aligning the name property with the human-readable name, the Azure CLI parses the file correctly, and your Custom Role appears in the portal exactly as expected.